<?xml version="1.0" encoding="utf-8"?><feed xmlns="http://www.w3.org/2005/Atom" ><generator uri="https://jekyllrb.com/" version="4.3.4">Jekyll</generator><link href="/feed.xml" rel="self" type="application/atom+xml" /><link href="/" rel="alternate" type="text/html" /><updated>2026-03-01T12:37:17+00:00</updated><id>/feed.xml</id><title type="html">Engineer</title><subtitle>Engineer is a free and open-source game where players create machines and buildings. Your survival depends on your engineering skills!</subtitle><author><name>Youen Toupin</name></author><entry><title type="html">Wheel suspensions</title><link href="/devlog/2026/02/14/wheel-suspensions.html" rel="alternate" type="text/html" title="Wheel suspensions" /><published>2026-02-14T00:00:00+00:00</published><updated>2026-02-14T00:00:00+00:00</updated><id>/devlog/2026/02/14/wheel-suspensions</id><content type="html" xml:base="/devlog/2026/02/14/wheel-suspensions.html"><![CDATA[<p>(<a href="https://mastodon.gamedev.place/@youen/116068896272629251">Originally posted on Mastodon</a>)</p>

<p>Here is the first mechanical part I’m modelling to use as a building block to make machines in the game. Not a simple example, it’s a vehicle wheel, with double A-arm suspension, and direction. I used <a href="https://www.freecad.org/">FreeCAD</a> for modelling, because it’s made exactly for the purpose of modelling mechanical parts, and also, let’s admit it, because I’m not experienced at all with Blender. My goal is to not lose too much time in 3D modelling, but even for prototyping I need something that players can understand when they look at it.</p>

<video class="blog-video" controls="" aria-describedby="2026-02-14-wheel-suspension-freecad-summary">
	<source src="/assets/img/posts/2026-02-14-wheel-suspension-freecad.mp4" type="video/mp4" />
	Your browser does not support the video tag.
</video>

<div id="2026-02-14-wheel-suspension-freecad-summary" class="video-alt">
A wheel suspension system, modelled in FreeCAD. The wheel is a simple dark grey cylinder, with a cylindrical hole in the middle. We see it from the inner side. A light grey articulated mechanism can attach the wheel to some vehicle frame (not visible on the image), while allowing vertical movement for suspension, as well as rotation around a vertical axis for direction. Two pistons act as springs for the suspension. The system is animated, showing how the wheel can go up and down, as well as rotate around the vertical axis to adjust direction.
</div>

<p>My constraint was mostly to make a modular system, with a single point of attachment (that’s the rectangular hollow plate visible at the foreground in the video), and also as compact as possible, since players will be placing wheels on their own designs, more compact means more freedom. But still have enough vertical suspension amplitude, to accommodate rough terrain.</p>

<p>Next step is to integrate this in the game. For this I need a skeleton, skin the parts on the skeleton, and add textures. None of this can be made with FreeCAD, so this is where I switch to <a href="https://www.blender.org/">Blender</a>. I’ve exported the FreeCAD model as a mesh, and imported it in Blender. This step is really not ideal, up until now the process was non-linear (if I wanted to modify any dimension for example, I could change it in FreeCAD and it would update the final result). But from this point if I have to change something in FreeCAD, I’ll have to restart all the work in Blender from scratch with the new model.</p>

<p>Here is the result after adding the skeleton in Blender:</p>

<video class="blog-video" controls="" aria-describedby="2026-02-14-wheel-suspension-blender-summary">
	<source src="/assets/img/posts/2026-02-14-wheel-suspension-blender.mp4" type="video/mp4" />
	Your browser does not support the video tag.
</video>

<div id="2026-02-14-wheel-suspension-blender-summary" class="video-alt">
Screen capture of Blender where the suspensions system is displayed as a mesh, along with a skeleton (sorry... "armature"). We see the mouse select each "bone" and change its rotation, and each part of the mesh follows the movement of the corresponding bone (Each arm, spring guide, etc.)
</div>

<p>Next I’ve added constraints so that the two piston parts remain aligned with each other, the top A-arm follows the bottom A-arm movement, and the spindle vertical axis remains vertical. This allowed to easily create two animations: one for the up/down suspension movement, and one for the direction wheel rotation.</p>

<p>The idea is that, in the game, the physics (Jolt engine) will simulate a vertical spring, so that the wheel can move up and down along a vertical axis. This is a simplified movement compared to the actual suspension mechanism. But it won’t be directly visible. Instead, it will drive the animation, which will rotate the suspension arms so that the wheel ends up at the correct relative height.</p>

<p>Here is the final result: the suspension system, modelled in FreeCAD, rigged, animated and textured in Blender, is now an interactive thing with the physics simulation in Godot:</p>

<video class="blog-video" controls="" aria-describedby="2026-02-16-wheel-suspension-ingame-summary">
	<source src="/assets/img/posts/2026-02-16-wheel-suspension-ingame.mp4" type="video/mp4" />
	Your browser does not support the video tag.
</video>

<div id="2026-02-16-wheel-suspension-ingame-summary" class="video-alt">
In first person view, the player builds a 4 wheeled vehicle, by placing metal beams that automatically weld together, and then adding wheels with suspensions. Then the player jumps on the frame, which shows that the suspensions react to the weight change as they should.
</div>

<p>However, I’m surprised how <em>small</em> it looks in the game 🫣 I should have known better, it’s not the first time I get surprised after spending time working on modelling in very close view.</p>

<p>Anyway, next step will be to make the wheels actually roll. More on that in the next post!</p>]]></content><author><name>Youen Toupin</name></author><category term="devlog" /><category term="godot" /><category term="technical" /><category term="engineer" /><summary type="html"><![CDATA[(Originally posted on Mastodon)]]></summary></entry><entry><title type="html">Object outlines</title><link href="/devlog/2026/02/08/object-outline.html" rel="alternate" type="text/html" title="Object outlines" /><published>2026-02-08T00:00:00+00:00</published><updated>2026-02-08T00:00:00+00:00</updated><id>/devlog/2026/02/08/object-outline</id><content type="html" xml:base="/devlog/2026/02/08/object-outline.html"><![CDATA[<p>(<a href="https://mastodon.gamedev.place/@youen/116013943457465718">Also on Mastodon</a>)</p>

<p>Using Godot, how does one draw an outline around a mesh, for example to show which object is selected? Sounds a simple enough question?</p>

<h2 id="exploring-the-new-godot-stencil-buffer">Exploring the new Godot stencil buffer</h2>

<p>Well, starting with Godot 4.5, there is a new functionality, which allows to use the stencil buffer. This is an offscreen texture that you can write into when rendering a mesh, and that can then be used to mask out something else later (either when rendering other meshes, or for fullscreen post-process effects).</p>

<p>
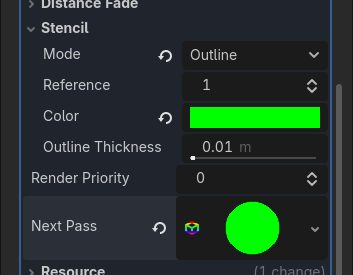
It’s really simple to use! You want an outline? In your material, select the “ouline” stencil mode in the drop down…</p>

<p><img src="/assets/img/posts/2026-02-08-stencil-built-in-outline-settings.png" alt="Close up of the Godot editor, where we can see the settings for the Stencil part of a material. There is a &quot;Mode&quot; with a dropdown currently showing &quot;Outline&quot;, another field &quot;Reference&quot; has been configured as &quot;1&quot;, then there is &quot;Color&quot; which is set to green, and &quot;Outline sickness&quot; set to 0.01m." /></p>

<p>
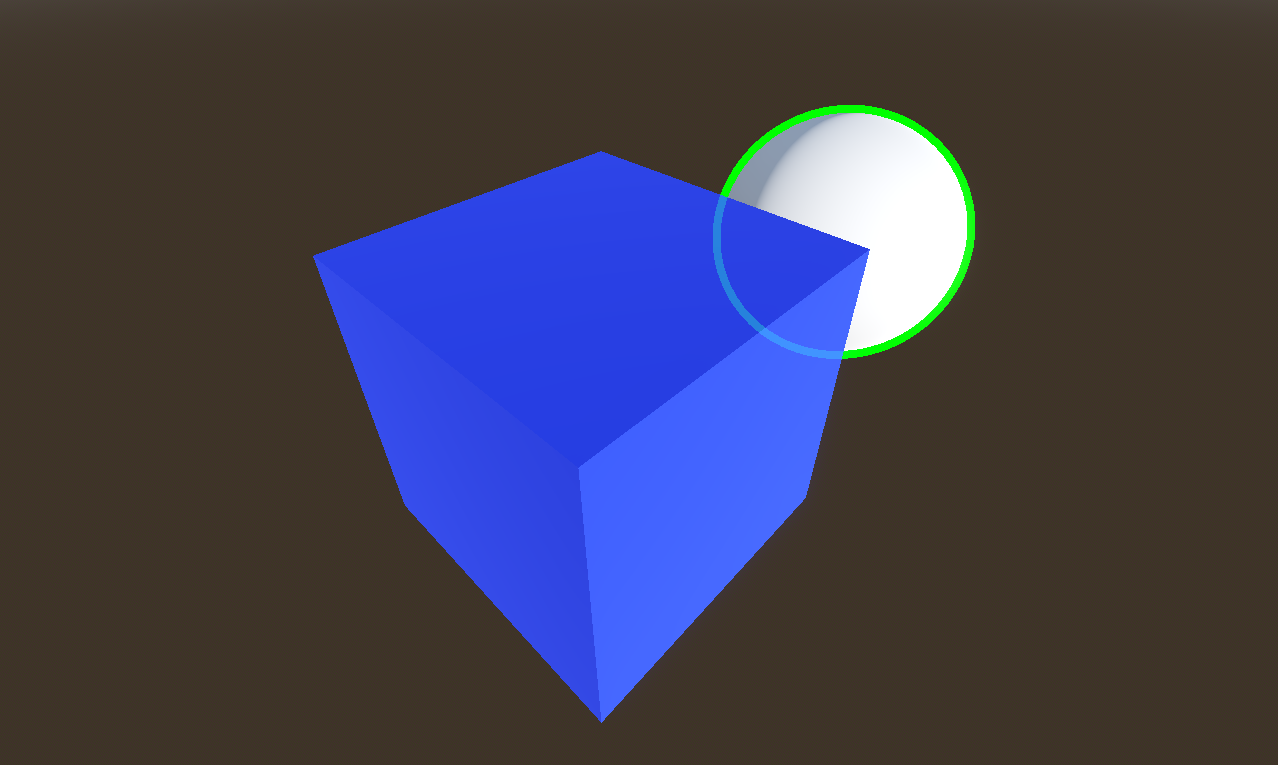
And here you go, you have a nice outline of your mesh (here we see the green outline around the sphere).</p>

<p><img src="/assets/img/posts/2026-02-08-stencil-built-in-outline-sphere.png" alt="A screenshot where we just see a white sphere on a brown background, and a blue box in front of the sphere, partially hiding it. The sphere has a green outline, which is also partially hidden by the box." /></p>

<p>Excepted… it’s not what I want. And also, it doesn’t work for a lot of cases.</p>

<p>What I want is the player to see the selected object in all situations, even if it’s hidden behind something else, so I want an X-ray outline. There <em>is</em> a built-in X-ray stencil mode, but it doesn’t do what I want either. It will fill the hidden part of the object with a solid color (instead of just an outline). So I’ll have to use the “custom” mode, much more versatile, but you have to create your own material for drawing the outline in a second pass. Fair enough, let’s do that!</p>

<h2 id="x-ray-outline">X-ray outline</h2>

<p>The idea for this second pass is to draw again the same mesh, with your desired outline color, but “grow” that mesh so that it extends around the original object, effectively drawing an outline. The inner part of this pass is masked by the stencil buffer, leaving only the outline visible. This is almost the same as just using the depth test, excepted for example a character having an arm in front of his body would get an outline around the arm if you use a depth test ; and also the depth test wouldn’t work at all for an X-ray outline. So here I use the stencil buffer to mask the inner part of the mesh when drawing the outline.</p>

<p>
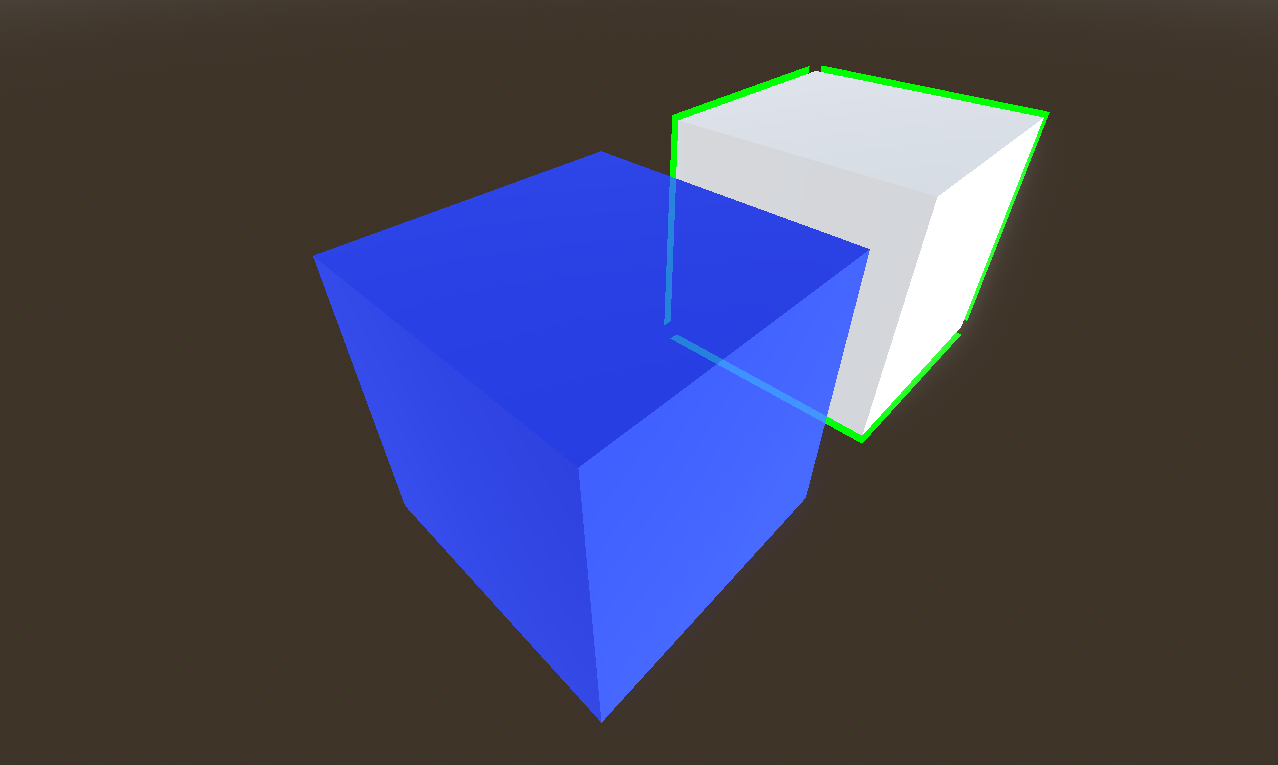
It’s still reasonably simple to configure, and you get a nice X-ray outline! It may not be completely obvious here, but the part of the outline we can see through the box is alpha blended, to make it a bit more clear it’s “behind”. Still have to tweak this.</p>

<p><img src="/assets/img/posts/2026-02-08-x-ray-outline-sphere.png" alt="Same as the previous screenshot, excepted the white sphere now has an outline that is also visible behind the blue box (though the sphere itself is not)." /></p>

<p>As far as I know, this is not fully documented yet, but to enable the stencil test in your shader, here is the syntax:</p>

<div class="language-plaintext highlighter-rouge"><div class="highlight"><pre class="highlight"><code>stencil_mode read, compare_not_equal, 1
</code></pre></div></div>

<h2 id="growing-a-mesh">Growing a mesh</h2>

<p>But we’re not done yet. You may remember I said it doesn’t work in a lot of cases (and maybe you already know the limitations of this technique!). To grow the mesh, the idea is to move each vertex in the direction of its normal. This works great for “smooth normals”, like for our sphere. But if you do this for a mesh with “hard edges”, each face will move in a different direction, leaving a gap in the middle.</p>

<p><img src="/assets/img/posts/2026-02-08-cube-grow.png" alt="A yellow wireframe cube, on which is overlaid white faces that are slightly offset to the exterior of the cube. Since each face moved in a different direction, there are gaps along the edges of the cube." /></p>

<p>
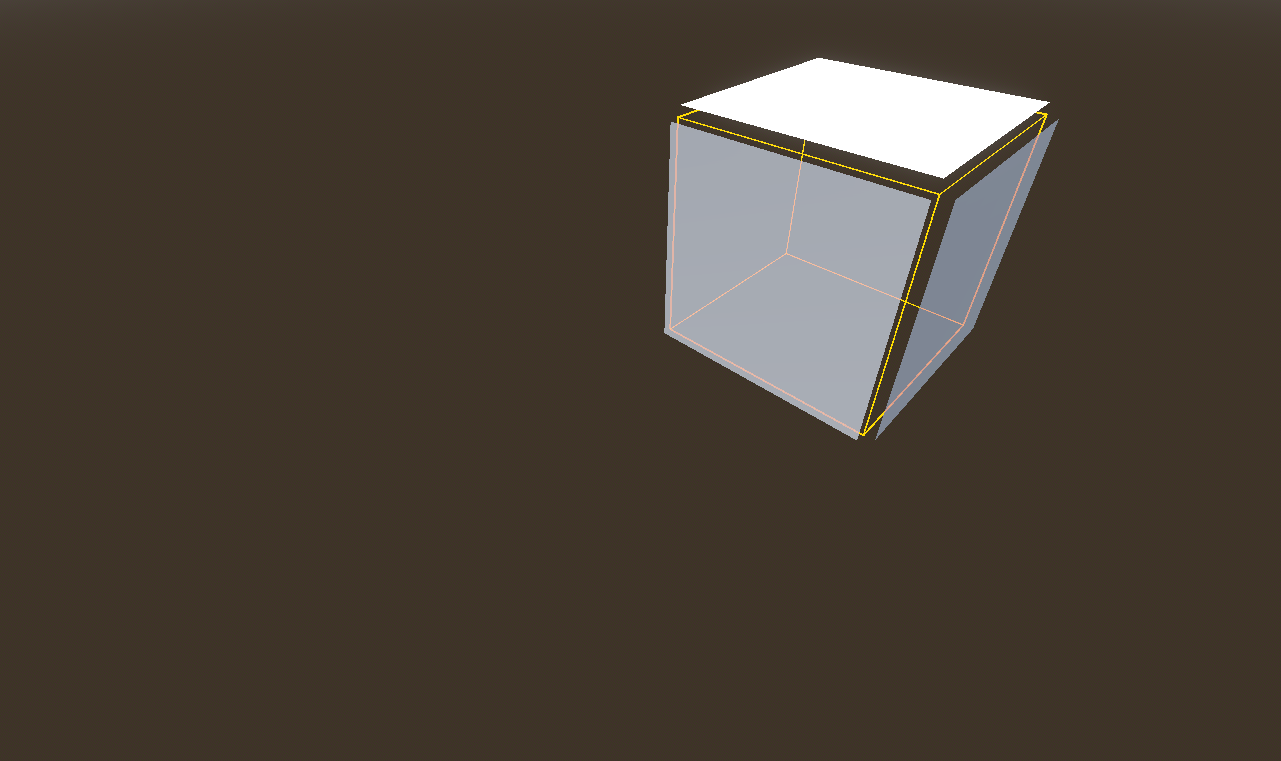
And, sure enough, this makes visible glitches on the outline. When looking at a grazing angle, you’ll even have whole edges missing their outlines.</p>

<p><img src="/assets/img/posts/2026-02-08-x-ray-outline-box.png" alt="A blue box in front, with a white box behind. The white box has a green outline. But around three vertices of the box, there is a gap in the outline, through which we see the background." /></p>

<p>In addition to this problem, using the built-in “grow” feature of Godot, while it allows to select the outline width, will make the outline look thinner as you move farther away, because of perspective. I’d prefer to specify the outline width in pixels. This is possible by using a custom vertex shader. But it still doesn’t solve the hard edge issues (and the similar issues that can happen with an mesh that is not closed).</p>

<p>There are several ways to fix this. One possibility would be to add two triangles for each hard edge. These triangles would have zero area and be invisible when drawing the mesh normally, but would expand to fill the gap when the mesh is grown. That wouldn’t fix the issue that the outline would look irregularly thinner depending on the view angle though. Also, this would add a significant amount of triangles, and this overhead would apply all the time, even when you don’t display an outline (the cost remains small since degenenerate triangles are not rasterized, but the mesh takes a more memory).</p>

<p>Another approach would be to add a channel on the vertex array to store the smooth normals, only used in the outline vertex shader, to grow the mesh. Probably less overhead, but still a cost on mesh size (I think it could be packed in 16 bits per vertex).</p>

<p>Another way is to generate a different mesh to draw the outline, which will have smooth normals (this could be made automatic, either in editor or at runtime). And I think that will be my preferred option. This mesh is only used for the outline, so when the object is rendered without outline there is no overhead.</p>

<h2 id="an-alternative-screen-space-edge-detection">An alternative: screen-space edge detection</h2>

<p>I haven’t explored a completely alternative route, which is to use a mask, and process it as an image in screen space, with an edge detection algorithm, to render the outline. This allows more subtle effects, such as a blurred outline, and could avoid to render the mesh twice (though not really due to Godot limitations), and would avoid all the issues with hard edges. But a full-screen post-process also comes with a cost. And an additional limitation is that you couldn’t display a different color when the outline is behind another object.</p>

<p>Beside, it is actually quite difficult to implement this in Godot in an efficitent way. The reasons are that there is no MRT support (multi render target), and, more importantly, you can’t specify a custom format for your render targets (as far as I know, they are all 32bits, and I’m not even sure you can avoid allocating another depth buffer). The only way, as far as I know, is to add a secondary viewport, and render your base objects here (so, yes, you still need to render the mesh twice), and then use the resulting texture in the post-process shader in the main viewport. Still, it would certainly work!</p>

<h2 id="conclusion">Conclusion</h2>

<p>What I learned while researching this outline subject, is that there is no perfect solution, you’ll have to choose your tradeoffs. And also, things that might look like long-solved problems are not always so simple to integrate.</p>]]></content><author><name>Youen Toupin</name></author><category term="devlog" /><category term="godot" /><category term="technical" /><category term="rendering" /><category term="engineer" /><summary type="html"><![CDATA[(Also on Mastodon)]]></summary></entry><entry><title type="html">Building machines</title><link href="/devlog/2026/02/04/machine-designer.html" rel="alternate" type="text/html" title="Building machines" /><published>2026-02-04T00:00:00+00:00</published><updated>2026-02-04T00:00:00+00:00</updated><id>/devlog/2026/02/04/machine-designer</id><content type="html" xml:base="/devlog/2026/02/04/machine-designer.html"><![CDATA[<p>(<a href="https://mastodon.gamedev.place/@youen/115996745098772280">Originally posted on Mastodon</a>)</p>

<p>I’ve started working on the system to build machines, which will be a central aspect of the game.</p>

<video class="blog-video" controls="" aria-describedby="2026-02-01-machine-designer-summary">
	<source src="/assets/img/posts/2026-02-01-machine-designer.mp4" type="video/mp4" />
	Your browser does not support the video tag.
</video>

<div id="2026-02-01-machine-designer-summary" class="video-alt">
Recording of a game in first person view. The ground is a green grass texture, we can see hills and mountains in the distance, under a blue sky with some white clouds. The player picks parts on a toolbar on the left of the screen, to place multiple beams attached to each other, and adds some kind of a wheel, to make a weird useless contraption that topples down on the ground.
</div>

<p>Nothing fancy so far, but I’m making progress. I still need to make wheels that actually roll, add the possibility to lock the direction, and this should already allow building a vehicle.</p>

<p>All in all, I feel this is easier to do with Godot than my first prototype with Unreal Engine.</p>

<p>Here I’m stress testing a bit the system, and already found emergent gameplay out of a single non-resizable dumb rectangular part 😉 You can build a bridge, even though you don’t have the right parts, and also that you can’t (yet) lift or otherwise move your contraption, and deleting parts is not implemented either. Which means you have to find creative ways to tilt the orientation of the thing during construction and be careful about the weight balance.</p>

<video class="blog-video" controls="" aria-describedby="2026-02-04-rigid-body-stress-test-summary">
	<source src="/assets/img/posts/2026-02-04-rigid-body-stress-test.mp4" type="video/mp4" />
	Your browser does not support the video tag.
</video>

<div id="2026-02-04-rigid-body-stress-test-summary" class="video-alt">
Video capture of a work-in-progress game in first person view. On a landscape with a green grass texture, under a blue sky with some clouds, the player builds a bridge over a flowing river, by placing identical rectangular parts. At some times, adding parts on one direction makes the structure tilt to a new orientation, allowing to place parts on the other side, etc. The walkway is made of multiple parallel beams, close enough that it's possible to walk on them. Some sections of the video are accelerated.
</div>

<p>On the technical side, the system is quite simple. The beam part is a small Godot scene consisting of a rigid body with a box collider and box mesh (placeholder graphics). You can then instantiate this small scene at will. Of course I also have some code to cast a ray from the camera through the mouse cursor to find the point where the part should be placed.</p>

<p>To attach two parts together, I don’t use joints (would be bad for performances and physics engine stability). Instead, I merge the rigid bodies, and add all the colliders as child nodes (and also update the total mass). So, the final bridge is a single rigid body. I still have to write some more code to correctly merge multiple inertia tensors. Godot usually makes these computations for you, but it works only in the case where the matter density is the same for all colliders. Here if I was to attach a lightweight wood part to a heavy steel part, it wouldn’t compute the correct mass distribution.</p>

<p>Another note is that it’s not meant to work that way in the final game, such a structure should not be a dynamic rigid body. You’ll be able to choose if you want your design to be dynamic (like a vehicle) or static (for a building, a bridge, etc.) Either way, you’ll be able to use a common set of parts, to make an articulated vehicle or a hangar door, water lock, or anything you can imagine (hopefully).</p>]]></content><author><name>Youen Toupin</name></author><category term="devlog" /><category term="machines" /><category term="engineer" /><category term="technical" /><summary type="html"><![CDATA[(Originally posted on Mastodon)]]></summary></entry><entry><title type="html">Filling a cave with water</title><link href="/devlog/2026/01/27/filling-a-cave-with-water.html" rel="alternate" type="text/html" title="Filling a cave with water" /><published>2026-01-27T00:00:00+00:00</published><updated>2026-01-27T00:00:00+00:00</updated><id>/devlog/2026/01/27/filling-a-cave-with-water</id><content type="html" xml:base="/devlog/2026/01/27/filling-a-cave-with-water.html"><![CDATA[<p>(<a href="https://mastodon.gamedev.place/@youen/115967065104884438">Originally posted on Mastodon</a>)</p>

<p>Here is a small technical demo showing what can be done with the <a href="https://github.com/Zylann/godot_voxel">Transvoxel terrain</a> and the fluid simulation.</p>

<p>Nothing related to actual gameplay, I’m just using a debug tool to dig spherical holes (it’s actually possible to dig/add matter in other shapes, making planar walls, etc.)</p>

<p>In the game I’m imagining, digging with manual tools would be very slow (only useful to recover small quantities of materials), and the player would need to design and use machines for larger earthworks.</p>

<video class="blog-video" controls="" aria-describedby="2026-01-27-cave-flooding-summary">
	<source src="/assets/img/posts/2026-01-27-cave-flooding.mp4" type="video/mp4" />
	Your browser does not support the video tag.
</video>

<div id="2026-01-27-cave-flooding-summary" class="video-alt">
First-person view video where the player digs a cave in the ground, then places a dam on the nearby river to make it flood the cave.
</div>]]></content><author><name>Youen Toupin</name></author><category term="devlog" /><category term="fluid_simulation" /><category term="engineer" /><summary type="html"><![CDATA[(Originally posted on Mastodon)]]></summary></entry><entry><title type="html">Creating an heightmap for the game world</title><link href="/devlog/2026/01/12/game-world-heightmap.html" rel="alternate" type="text/html" title="Creating an heightmap for the game world" /><published>2026-01-12T00:00:00+00:00</published><updated>2026-01-12T00:00:00+00:00</updated><id>/devlog/2026/01/12/game-world-heightmap</id><content type="html" xml:base="/devlog/2026/01/12/game-world-heightmap.html"><![CDATA[<p>(<a href="https://mastodon.gamedev.place/@youen/115883650783986664">Originally posted on Mastodon</a>)</p>

<p>I searched for some time a tool to author a game world heightmap. There are different possible approaches.</p>

<ul>
  <li>You could draw a heightmap in an image editor, but good luck with that</li>
  <li>You can use tools made to interactively shape a terrain, such as World Creator</li>
  <li>You can use node-based generators which combine mathematical functions to generate a heightmap, such as World Machine or Houdini</li>
  <li>There are also voxel editors such as Avoyd but I didn’t find one with practical edition tools for a big terrain</li>
</ul>

<p>Now if you don’t have a budget to pay for a commercial tool, it limits the options. I’ve quickly evaluated the following free and open-source tools: <a href="https://hme.sourceforge.net/">HeightMap Editor</a>, <a href="https://www.worldpainter.net/">World Painter</a>, <a href="https://www.worldsynth.net/">World Synth</a>, and <a href="https://github.com/otto-link/Hesiod">Hesiod</a>.</p>

<p>And I stopped my search here, when I discovered Hesiod. It’s a node-based heightmap generator, and the only free tool I’ve found that I think can really work for the kind of world I want to create.</p>

<p>Hesiod is surprisingly complete and usable, given it’s mostly developed by a single person. It has its quirks, some things are not finished, some things are missing, but overall it’s a great tool.</p>

<p>Here is a demo of the kind of thing that can be done with a graph of nodes. It’s not really intuitive to begin with, you may wonder “how can you even make a terrain out of a node graph?” and “where do I start?”, but once you get the principles, it’s really powerful. Here I draw some lines that represent the ridge of a moutain chain, and the configured nodes will “extrude” them to create the mountains, and then generate random noise to add details. Finally, an erosion simulation makes it look more realistic (but this last part is still a weak point of Hesiod: it’s there, it kind of works, but I couldn’t get results anything close to what World Machine can do for example).</p>

<video class="blog-video" controls="" aria-describedby="2026-01-12-hesiod-summary">
	<source src="/assets/img/posts/2026-01-12-hesiod.mp4" type="video/mp4" />
	Your browser does not support the video tag.
</video>

<div id="2026-01-12-hesiod-summary" class="video-alt">
Screen capture of Hesiod, showing a mountain range on the top view, and the node graph that generated it underneath. Clicking on the first node, it is possible to edit a path, which defines the ridge line of the mountain range. Points of the path are moved to show how the mountains are impacted. By the addition of noise and an erosion simulation, the result looks somewhat realistic (though it's only a white mesh, shaded but without texturing)
</div>

<p>Here is an early attempt to create my game world, showing how each group of nodes impacts the result:</p>

<video class="blog-video" controls="" aria-describedby="2026-01-13-hesiod-island-summary">
	<source src="/assets/img/posts/2026-01-13-hesiod-island.mp4" type="video/mp4" />
	Your browser does not support the video tag.
</video>

<div id="2026-01-13-hesiod-island-summary" class="video-alt">
Video capture of the interface of Hesiod, showing a rotating landscape. As the user clicks on the graph nodes below, it shows different features constituting the landscape: an island coastline, then cliffs that border part of the island, then a volcano (based on the actual elevation map of mount Etna), the a mountain range, and finally the sea plane to better show the coastline.
</div>

<p>To give an idea of scales, the map is 16x16km, which means the cliffs on the coast are about 300m high, and I don’t know exactly but the highest mount probably 2km high.</p>

<p>In-game we are really much closer than this preview. So the heightmap needs to be exported at high resolution (my target is 8192x8192, which means one point every 2m of terrain).</p>

<p>I couldn’t achieve such details with real Earth elevation maps, and of course I can’t draw that kind of data by hand.</p>

<p>A difficulty with node-based tool is to find ways to mix your authoring (I need a moutain there, a river here) with “automatic” details generation. A lot of examples begin with a completely random landscape ; you can still choose the density of mountains and things like that, but for example you can not choose where each mountain goes. Instead, the process I’ve come up with is to draw, simple images to define what I want, such as an island shape, ridge line of mountains, path of rivers. These are drawn by hand in Gimp.</p>

<p>Here are all the layers I’ve used: the island in white, mountain ridges in black, and rivers in dark blue.</p>

<p><img src="/assets/img/posts/2026-01-26-base-island.png" alt="A few black jagged-lines on a white island. This is a map of the mountain ridges. Arround the island is a light blue sea. There are also dark blue lines for the rivers, between the moutain ridges." /></p>

<p>Then I use nodes to work on this base and turn the images into terrain features, add details, remove depressions created by the random noise, and dig the river beds. Since it’s a non-linear process, I can update the base images and re-generate everything.</p>

<p>To make the rivers layer I’ve used a node of Hesiod “Select valleys” that automatically detects the valleys. The generated image was not clean enough however, and I needed to extend the rivers until the sea, so I edited the image in Gimp and re-imported it in Hesiod. This is not really a good process since I’d need to do it again by hand if I change anything that could move the valley bottom (even the random noise), but it works for now.</p>

<p>Here is the last version so far. The most difficult part is to get coherent river beds (always going downhill, even though the terrain is partly made of random noise).</p>

<video class="blog-video" controls="" aria-describedby="2026-01-26-hesiod-island-v4-summary">
	<source src="/assets/img/posts/2026-01-26-hesiod-island-v4.mp4" type="video/mp4" />
	Your browser does not support the video tag.
</video>

<div id="2026-01-26-hesiod-island-v4-summary" class="video-alt">
Video capture of Hesiod node editor, with the 3D preview showing the terrain relief. The camera rotates around a white island with mountains and river beds flowing at the bottom of valleys, surrounded by the sea.
</div>

<p>It’s not finished, but I think it looks cool for a starting point, to define scales and place the main elements.</p>

<p>And here is how it looks in the game, and also with the <a href="/devlog/2025/12/22/water-rendering.html">fluid simulation</a> to have actual rivers infinitely flowing from the sources I’ve placed, until it gets to the sea.</p>

<video class="blog-video" controls="" aria-describedby="2026-01-26-ingame-island-v4-summary">
	<source src="/assets/img/posts/2026-01-26-ingame-island-v4.mp4" type="video/mp4" />
	Your browser does not support the video tag.
</video>

<div id="2026-01-26-ingame-island-v4-summary" class="video-alt">
Video capture of the game, where we see the same terrain as the previous video, but this time in a first-person view. The ground is textured with gravels, grass and rocky slopes. The player flies from the sea along a river in the valleys, until it reaches one of the sources.
</div>

<p>It’s still very empty, but there should be some potential for interesting perspectives.</p>

<p>I’m not completely satisfied with the results though, and I think I have an issue somewhere that makes things smoother than it should, but it still gives a good base terrain to work with. It will necessarily be an iterative process, for example so far I didn’t add trees or rocks, so I can’t really grasp yet what works, what is good enough, and what will need to be improved.</p>]]></content><author><name>Youen Toupin</name></author><category term="devlog" /><category term="world" /><category term="terrain" /><category term="heightmap" /><category term="technical" /><category term="engineer" /><summary type="html"><![CDATA[(Originally posted on Mastodon)]]></summary></entry><entry><title type="html">Water rendering</title><link href="/devlog/2025/12/22/water-rendering.html" rel="alternate" type="text/html" title="Water rendering" /><published>2025-12-22T00:00:00+00:00</published><updated>2025-12-22T00:00:00+00:00</updated><id>/devlog/2025/12/22/water-rendering</id><content type="html" xml:base="/devlog/2025/12/22/water-rendering.html"><![CDATA[<p>(<a href="https://mastodon.gamedev.place/@youen/115765148018752452">Originally posted on Mastodon</a>)</p>

<p>I’m working on the generation of the mesh to render the simulated water. It’s a bit weird with this debug material, but very useful during development. Also, I can now run the simulation in the Godot editor which is very handy.</p>

<video class="blog-video" controls="" aria-describedby="2025-12-22-water-mesh-debug-summary">
	<source src="/assets/img/posts/2025-12-22-water-mesh-debug.mp4" type="video/mp4" />
	Your browser does not support the video tag.
</video>

<div id="2025-12-22-water-mesh-debug-summary" class="video-alt">
Screen capture of the 3D green mountainous terrain under a blue sky. This time it runs in the Godot editor. We can see a small stream of "water" running down the slope, excepted it's a debug material, an opaque checkerboard of gray and white squares. The flow increases and a larger amount of water flows down the slope, seen from multiple camera angles.
</div>

<p>Each square is a voxel of liquid (1 meter per 1 meter).</p>

<p>Next step is the water material. I do not plan to achieve anything photo-realistic, but at least something translucent, with animated ripples, following the flow speed.</p>

<p>I’ve implemented a system that generates a flow map, storing the water velocity in each vertex of the mesh. Then I took <a href="https://github.com/marcelb/GodotSSRWater">this shader</a>, and made some modifications to add the flowing movement and support non-horizontal surfaces. It’s not final yet, lot of things to improve, and I’d like to add foam, but it’s already really improving the result!</p>

<video class="blog-video" controls="" aria-describedby="2025-12-22-water-shader-summary">
	<source src="/assets/img/posts/2025-12-22-water-shader.mp4" type="video/mp4" />
	Your browser does not support the video tag.
</video>

<div id="2025-12-22-water-shader-summary" class="video-alt">
Yet another screen capture video of the same 3D green mountainous terrain under a blue sky, running in the Godot editor. We can see a small stream of water running down the slope, successively filling two small ponds, overflowing and continuing as a small stream in the distance. The water shader has animated ripples which follow the correct flow direction (even though there are glitches), and reflects the environment and the sun.
</div>

<p>Each horizontal slice of water runs a micro-fluid-simulation to compute the local flow map, using the “virtual pipes” method, which is <a href="https://lisyarus.github.io/blog/posts/simulating-water-over-terrain.html">nicely explained here</a>. The result gives a map of velocities, and as long as the shape of the slice does not change, this is not re-computed. So while the shader gives an illusion of movement, the flow map is static and only upated when needed.</p>

<p>The simulation is split in chunks, and a mesh is generated for each chunk only when its shape is modified. So this doesn’t use much computation power, since in most cases only a few chunks are modified each frame, most of the simulation is in a stable state. Still, there are cases where more chunks are impacted, so to avoid degrading performances when it happens, I have implemented the liquid mesher in a separate thread.</p>

<p>I’ve also made some improvements and fixed bugs. And I’m spending way too much time looking at the results, especially when I’m tired 😅 I guess it’s a bit mesmerizing.</p>

<video class="blog-video" controls="" aria-describedby="2026-01-08-multithreaded-liquid-mesher-summary">
	<source src="/assets/img/posts/2026-01-08-multithreaded-liquid-mesher.mp4" type="video/mp4" />
	Your browser does not support the video tag.
</video>

<div id="2026-01-08-multithreaded-liquid-mesher-summary" class="video-alt">
Video of a 3D landscape seen from the top. We can see a river flowing in from the left of the screen, filling a pool, then overflowing to form another pool a bit farther, and so on, until the river can weave away in the distance.
</div>]]></content><author><name>Youen Toupin</name></author><category term="devlog" /><category term="fluid_simulation" /><category term="technical" /><category term="engineer" /><summary type="html"><![CDATA[(Originally posted on Mastodon)]]></summary></entry><entry><title type="html">Debugging a game that captures the mouse</title><link href="/devlog/2025/12/08/debugging-mouse-capture.html" rel="alternate" type="text/html" title="Debugging a game that captures the mouse" /><published>2025-12-08T00:00:00+00:00</published><updated>2025-12-08T00:00:00+00:00</updated><id>/devlog/2025/12/08/debugging-mouse-capture</id><content type="html" xml:base="/devlog/2025/12/08/debugging-mouse-capture.html"><![CDATA[<p>(<a href="https://mastodon.gamedev.place/@youen/115686033234471690">Originally posted on Mastodon</a>)</p>

<p>You may have encountered the issue where your program captures the mouse, and when you hit a breakpoint you don’t get back the control of your pointer to use the debugger? Not very handy, especially if you don’t master the keyboard shortcuts of your debugger (seriously, I need a mouse, can’t do anything without one 😅)</p>

<p>Well, I suppose in a perfect world this should be handled at the OS level, but I’ve found a workaround (tested on Debian, with an IDE that uses GDB as debugger):</p>

<p>first, <code class="language-plaintext highlighter-rouge">apt install xdotool</code></p>

<p>then, edit or create file <code class="language-plaintext highlighter-rouge">~/.gdbinit</code>, and add the following in that file:</p>

<div class="language-plaintext highlighter-rouge"><div class="highlight"><pre class="highlight"><code>python
def ungrab (event):
    gdb.execute("shell xdotool key XF86Ungrab")

gdb.execute("shell setxkbmap -option grab:break_actions")
gdb.events.stop.connect(ungrab)
end
</code></pre></div></div>

<p>Restart your IDE, and you should be all set.</p>

<p>What this does, is that when GDB stops the execution of a program, it sends the keycode <code class="language-plaintext highlighter-rouge">XF86Ungrab</code> which asks the OS to release the mouse grab. Works flawlessly for me!</p>]]></content><author><name>Youen Toupin</name></author><category term="devlog" /><category term="technical" /><summary type="html"><![CDATA[(Originally posted on Mastodon)]]></summary></entry><entry><title type="html">Shrinking water flow after a flood</title><link href="/devlog/2025/12/07/shrinking-flow-after-flood.html" rel="alternate" type="text/html" title="Shrinking water flow after a flood" /><published>2025-12-07T00:00:00+00:00</published><updated>2025-12-07T00:00:00+00:00</updated><id>/devlog/2025/12/07/shrinking-flow-after-flood</id><content type="html" xml:base="/devlog/2025/12/07/shrinking-flow-after-flood.html"><![CDATA[<p>(<a href="https://mastodon.gamedev.place/@youen/115679186513662991">Originally posted on Mastodon</a>)</p>

<p>Testing ideas for my  fluid simulation system. The data structure to represent liquids in memory stores horizontal liquid slices, which are simply slices of 1m height that can have any shape seen from the top, encoded as an image with 1 bit per pixel.</p>

<p>As liquid quantity increases, a slice can grow lateraly (if not blocked by surrounding terrain), to simulate spreading of the liquid.</p>

<p>What wasn’t implemented yet is, if the liquid quantity decreases, then the slice should shrink.</p>

<p>Here is my attempt so far. It works quite well in this simple case. It still has the issue that the final shape is a bit random, and growing/shrinking cycles will potentially result in different shapes each time.</p>

<video class="blog-video" controls="" aria-describedby="2025-12-07-shrink-test-summary">
	<source src="/assets/img/posts/2025-12-07-shrink-test.mp4" type="video/mp4" />
	Your browser does not support the video tag.
</video>

<div id="2025-12-07-shrink-test-summary" class="video-alt">
A top view of a "liquid slice". It's just a few white pixels over a black background. There is also a green area (representing liquid input) and a red area (representing liquid output). The video shows a "tick" button, which gets repeatedly clicked. Each time, the slice shrinks, showing fewer and fewer white pixels, until only a thin path remains connecting the green area to the red area.
</div>

<p>This idea doesn’t work that well when there is a loop somewhere though. And, again, the problem that the resulting shape doesn’t necessarily make sense. This could probably be improved by using terrain height (removing pixels that are at a higher altitude first, so that in the end the path follows the lowest altitude).</p>

<video class="blog-video" controls="" aria-describedby="2025-12-07-shrink-test-loop-summary">
	<source src="/assets/img/posts/2025-12-07-shrink-test-loop.mp4" type="video/mp4" />
	Your browser does not support the video tag.
</video>

<div id="2025-12-07-shrink-test-loop-summary" class="video-alt">
Similar video, but this time the white area has a small hole (a black pixel). As the "tick" button gets clicked, this hole increases in size, and in the end the path from the green to the red area has junction with two possibilities.
</div>

<p>But after playing a bit with this idea, I came to the conclusion it won’t give good results. A bit sad because it was simple and could have a very efficient implementation.</p>

<p>Here is the result in the game. And it creates quite a mess. I’m really not satisfied.</p>

<video class="blog-video" controls="" aria-describedby="2025-12-07-shrink-test-ingame-summary">
	<source src="/assets/img/posts/2025-12-07-shrink-test-ingame.mp4" type="video/mp4" />
	Your browser does not support the video tag.
</video>

<div id="2025-12-07-shrink-test-ingame-summary" class="video-alt">
Screen capture of the 3D green mountainous terrain under a blue sky. There is a dam retaining a pool of water. The player digs a hole in the dam, releasing the water, wich rushes down the slope over a large area. Once the wave has passed, water recedes but leaves a weird maze of lines of water behind.
</div>

<p>My next idea is a “reshape” algorithm, that will find the shortest path from input to output (also favoring lower altitude), and then spread that path as much as required to get the desired thickness. However this could become costly for big slices.</p>

<p>After implementing this idea, the simulation works much better ☺️</p>

<video class="blog-video" controls="" aria-describedby="2025-12-12-reshape-shrinking-slices-summary">
	<source src="/assets/img/posts/2025-12-12-reshape-shrinking-slices.mp4" type="video/mp4" />
	Your browser does not support the video tag.
</video>

<div id="2025-12-12-reshape-shrinking-slices-summary" class="video-alt">
Again a screen capture of the 3D green mountainous terrain under a blue sky. There is a dam retaining a pool of water. The player digs a hole in the dam, releasing the water, which rushes down the slope over a large area. Once the flooding wave has passed, water recedes to a thinner river bed.
</div>

<p>Arguably, it looked interesting before too, but the result was unpredictable, and completely different before/after a flood.</p>

<p>The new version produces a much more reasonable river bed after the flood. It does leave a few puddles here and there, but that’s not a problem, I can add an evaporation system to make them go away after some time.</p>]]></content><author><name>Youen Toupin</name></author><category term="devlog" /><category term="godot" /><category term="fluid_simulation" /><category term="engineer" /><category term="technical" /><summary type="html"><![CDATA[(Originally posted on Mastodon)]]></summary></entry><entry><title type="html">Engineer game project overview</title><link href="/devlog/2025/11/30/game-project-overview.html" rel="alternate" type="text/html" title="Engineer game project overview" /><published>2025-11-30T00:00:00+00:00</published><updated>2025-11-30T00:00:00+00:00</updated><id>/devlog/2025/11/30/game-project-overview</id><content type="html" xml:base="/devlog/2025/11/30/game-project-overview.html"><![CDATA[<p>(<a href="https://mastodon.gamedev.place/@youen/115638685523401124">Originally posted on Mastodon</a>)</p>

<p>I realize I’ve never presented any overview of the game I’d like to create. So, let’s try to introduce it here.</p>

<p>The core idea is a construction game, where the player can build various machines and buildings (hence the game codename “Engineer”). Similar to what can be done in Kerbal Space Program. Except not in space. This would range from vehicles (trucks, trains, planes, boats) to automated factories, hydraulic power plants, navigation locks, etc. With an emphasis on emergent gameplay, using very generic parts that players can shape and combine to create functionality.</p>

<p>Here is an old prototype I made with Unreal Engine showing some ideas. I’ve now switched to Godot, which means I’m basically starting over. But Godot is really more aligned with my values, objectives and constraints (free-software game, compatible with old hardware, slow development).</p>

<video class="blog-video" controls="" aria-describedby="old-ue-prototype-summary">
	<source src="/assets/img/posts/old-ue-prototype.mp4" type="video/mp4" />
	Your browser does not support the video tag.
</video>

<div id="old-ue-prototype-summary" class="video-alt">
A video presenting various scenes in a work-in-progress game. It takes place in a green landscape near a river, under a blue sky, in first-person view. First the player designs a vehicle by placing wheels and a seat on a frame. Then the vehicle is spawned in the world and the player can drive it. After that the player cuts down a tree and removes branches and shapes the trunk into a square wood piece. Then we see the player constructing a big building forming a bridge over a river, and the vehicle can also cross the bridge. And finally the player adds a water wheel under the bridge, and places rods to link it to a big circular saw, that is then used to cut down the wood piece into planks.
</div>

<p>Now that I have a basic landscape and water system, my next focus will be to implement the construction mechanics in the Godot game.</p>

<p>The code is here if anyone is interested https://git.engineer-game.org/Engineer</p>

<p>There would be a resource gathering and refinement system too, based on kind-of-realistic mechanics. The idea is to reproduce real life technology advancement, starting from almost nothing, but with modern knowledge.</p>

<p>Which brings us to the game plot. I always feel that pure sandbox games are kind of boring. Even a simple plot can add a lot to drive the player towards various goals, motivate exploration, create challenges. I already have an overview in mind, whose main themes are ecology, natural resource depletion, and technological domination. But I still need to structure and develop it, and find ways to integrate it in the game without introducing too much work load.</p>]]></content><author><name>Youen Toupin</name></author><category term="devlog" /><category term="engineer" /><summary type="html"><![CDATA[(Originally posted on Mastodon)]]></summary></entry><entry><title type="html">Fluid simulation improvements</title><link href="/devlog/2025/11/14/fluid-simulation-improvements.html" rel="alternate" type="text/html" title="Fluid simulation improvements" /><published>2025-11-14T00:00:00+00:00</published><updated>2025-11-14T00:00:00+00:00</updated><id>/devlog/2025/11/14/fluid-simulation-improvements</id><content type="html" xml:base="/devlog/2025/11/14/fluid-simulation-improvements.html"><![CDATA[<p>(<a href="https://mastodon.gamedev.place/@youen/115548778401568180">Originally posted on Mastodon</a>)</p>

<p>I’ve been working a bit more on #LiquidSimulation for my game, and I’m starting to be happy with the results!</p>

<video class="blog-video" controls="" aria-describedby="2025-11-14-fluid-simulation-improvements-summary">
	<source src="/assets/img/posts/2025-11-14-fluid-simulation-improvements.mp4" type="video/mp4" />
	Your browser does not support the video tag.
</video>

<div id="2025-11-14-fluid-simulation-improvements-summary" class="video-alt">
Screen capture video of a green mountainous landscape in first person view. Water comes out of the ground at some locations and begins to stream down the slopes, splitting and joining, filling holes in the ground, as it continues to progress downhill.
</div>

<p>My objective is to simulate rivers and lakes on a “large” world (20km x 20km), and allow the player to modify the terrain, build dams, locks, underwater buildings… This is a 3D simulation, which includes the possibility to make underground rivers (communicating vessels), etc.</p>

<p>As you can see, rendering is ugly for now (not my focus yet)</p>

<p>Here is another example, with a much higher liquid flow (it comes from infinite water sources). In this example it creates a bigger river that fills a lake. The end of the video is accelerated (it takes almost an hour to fill the lake to that level but then there is not really an upper limit anyway).</p>

<video class="blog-video" controls="" aria-describedby="2025-11-14-higher-liquid-flow-summary">
	<source src="/assets/img/posts/2025-11-14-higher-liquid-flow.mp4" type="video/mp4" />
	Your browser does not support the video tag.
</video>

<div id="2025-11-14-higher-liquid-flow-summary" class="video-alt">
Video similar to the previous one, showing a liquid simulation on a green landscape. The water flows in a deep trench in the ground until it reaches a big depression in the ground that it fills to create a lake.
</div>

<p>The idea of course would be to pre-compute all this so that everything is in a steady state when starting the game. But a player that would break a dam during the game could create this kind of behavior.</p>

<p>After a few improvements and fixed bugs, dynamically modifying the terrain now correctly impacts the liquid simulation.</p>

<video class="blog-video" controls="" aria-describedby="2025-11-29-modified-terrain-fluid-simulation-summary">
	<source src="/assets/img/posts/2025-11-29-modified-terrain-fluid-simulation.mp4" type="video/mp4" />
	Your browser does not support the video tag.
</video>

<div id="2025-11-29-modified-terrain-fluid-simulation-summary" class="video-alt">
Screen capture video of a green mountainous landscape in first person view (mostly flying in debug camera mode). Water comes out of the ground at some locations and streams down the slopes. The player spawns big spheres that modify the terrain, forcing water to flow differently. At some point, the player digs a big tunnel to allow water to flow beneath the terrain.
</div>

<p>Still a lot of things to improve. Rendering something that actually looks like water, adding the pressure system, allowing slices to shrink when liquid level is low, fixing bugs…</p>]]></content><author><name>Youen Toupin</name></author><category term="devlog" /><category term="godot" /><category term="fluid_simulation" /><category term="engineer" /><summary type="html"><![CDATA[(Originally posted on Mastodon)]]></summary></entry></feed>